Thanks for writing. We get many questions about how to build a dock bubbler or ice eater and indeed it is possible for a do it yourself person to make their own using any air pump or sump pump.
First let's talk about the two principle methods of protecting docks, walls, damns and structures from ice. The first is a submersed motor than pumps water or spins a propellor to create thrust that agitates water and circulates warmer waters enough to prevent ice from forming.
Here is a commercial De-Icer unit:
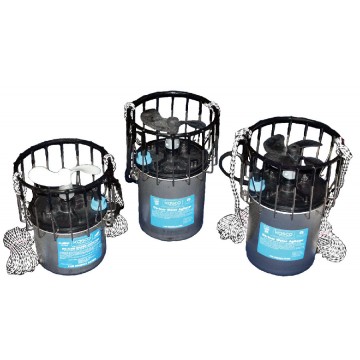 This is a commercial Ice Eater® that is suspended by mooring ropes below a dock or boathouse or slips. The propeller spins creating a strong thrust that is directed via the cowling towards the surface at an angle that best ensures a proper ice opening.
A 3/4 HP Ice Eater can keep an area free from ice from 30 to 60 feet in diameter. It uses only 4.7 AMPS at 115V or 2.35 AMPS at 230V making it an efficient and low cost method of de-icing. Thrust Deicer prices and more information is here
Someone with a well-stocked tool-shed or a machine-shop or motor fan can understand that there are likely ways to construct an Ice Eater using parts around the farm. An outboard motor, a few well designed gears and levers connected to a rotary compressor can create the same effect which is to push water to create a current that reduces ice formation.
The Dock Bubbler System is different. It uses air pumped through diffusers or tubing to create zones of movement in a similar principal as the de-icer but a slightly different physics is involved. We use a commercial bubbler hose and before we start building our do-it-yourself model let's look at the specialty product:
Building a homemade dock bubbler or deicer isn’t that difficult and while there are commercial systems available it is also possible to easily build a winter ice protection system for docks or structures using sump pumps, pond pumps and tubing and air pumps that you may have on-site.
If you want to build your own dock bubbler or ice eater then this may help with planning and parts:
An ice eater is sometimes referred to as a bubbler or a deicer. Strictly speaking a bubbler uses compressed air which is sent through perforated pipes or hoses to create bubbles that rise to the surface. These bubbles will create a current or pumping action towards the surface and will tend to pull warmer waters to the surface where this warmer water prevents ice from former.
An ice eater or deicer is a device that uses a submersible motor with an impeller or propeller that creates a thrust much like an outboard motor uses a prop to push it forward. Warmer waters are thrust towards the surface by the propeller of the deicer and the warmer waters combined with the agitation of the moving water create an area of open ice.
Build your own Bubbler Dock Deicer
If you don’t want to use a commercially available bubbler system like our dock bubbler systems then you can certainly build your own quite easily. The first thing you need is an air pump or air compressor or blower to push air into your device that will release this air below the surface around your dock in the form of bubbles.
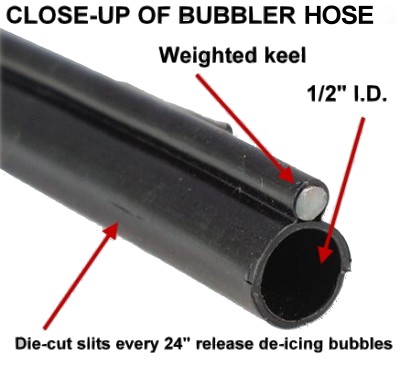
You can make your own bubbler hose by drilling small holes into a poly pipe irrigation type of heavy duty product or a SCH 40 piping which is not flexible but is good for long runs and is easily attached to pilings and structures that need bubbler protection.
Holes should be drilled no closer than 6” apart and no further apart than 24”. Holes should be drilled into the pipe using a 1/32” or 1/64” drill bit. In some cases where high airflow volumes are required you can go 1/16” or larger. Drill some holes and run some tests instead of trying to do everything in November.
If you are using a poly pipe, the flexible heavy-duty irrigation line, you should use a ½” poly pipe as the smallest diameter. Typically a 5/8” or ¾” will suffice.
Always use a check valve at the union between your feeder line and the bubbler tube to help reduce the amount of water that enters the feeder line via the holes in the bubbler tube.
If it’s possible to ensure that the drilled holes are in the bottom of the tube, facing the bottom not towards the surface, you will have less water infiltration into the bubbler hose. This is easiest when you attach your piping to a structure and especially if using a solid pipe like a SCH 40 or SCH 80 pipe. When using poly pipe it will not always be easy to ensure the holes remain facing down but if at all possible it will help.
The diameter of the hose or pipe you drill holes in to become your bubbler hose will dictate the amount of air volume you can push through the length of your desired bubbler line. If you try and force too much airflow through a ½” pipe you will create a back pressure that will reduce flow and cause wear on your compressor. Calculate the proper CFM you can push safely through your piping to ensure you have a pump, blower or compressor that pushes the right amount of air for the length of bubbler hose you want to use.
Another type of bubbler system uses a coarse bubble diffuser to create a single large open area of water that remains ice free. Our commercial system, the large lake bubbler, is a complete package but you can also build your own.
Run a line from your air compressor to a homemade coare bubbler diffuser in your pond. To make the do it yourself pond diffuser for de-icing take a 5 gallon pail and fill it half full with small stones. Drill a hole in the side of the pail, at the bottom of the pail, and insert your airline so it is in the middle of the pail buried under the stones. Use a bulkhead fitting to ensure the tubing will not dislodge from the pail. As air from your pump flows into the stones it will be broken up into a coarse bubble column that will rise to the surface and keep a hole open. This sort of technique works best in deeper ponds and lakes to prevent fish kills but can also serve as a structural deicer. The hole in the ice will be larger the deeper your coarse bubbler diffuser is placed.
We sell a weighted de-icer bubbler hose that is a lead weighted poly pipe with surgical slits every 24" which is the standard for commercial deicers. See our deicer tubing.
Build your own Ice Eater or Deicer
The commercially available ice eaters and deicers push water from deep areas towards the surface using a prop on a rotating shaft with a submersed motor powering the unit. If you want to build your own deicer or ice eater you just need to have a motor inside of a water tight casing with a preferably stainless steel shaft extruding 6” and attach a prop, a motor boat prop will work fairly well.
This is a complicated proposition and is why the commercial Kasco Deicers or Ice Eater brand units.