Your shopping cart is empty!
Categories
- Soilfloc Pond Sealant
- Aeration Systems
- Air Pumps & Compressors
- Algae Control
- Algaecides & Herbicides
- Bacteria & Clarifiers
- DC Compressors & 12V Pumps
- Diffusers & Airstones
- Dock Bubblers & Deicers
- Dyes & Colorants
- Fountains
- Muck Removal
- Nozzles & Fountain Heads
- Pond Liner
- Pond Pumps
- Ponds & Lakes
- Treatments
- Tubing & Accessories
- Water Level Control & Gates
- Windmill Aeration
- Commercial & Industrial Supplies
- Solar Aeration
-
Information
- - Aeration
- - Air Pumps: Linear or Diaphragm
- - Airline & Tubing for Aeration Systems
- - Beneficial Bacteria
- - Build a Solar Aerator
- - Building A Dock Bubbler System
- - Building A Pond
- - Compost Aeration & Compost Tea
- - Diffusers: The Key To Efficient Aeration
- - Dissolved Oxygen Levels
- - Dock Bubblers & Deicers
- - Duckweed Control
- - Eurasian Milfoil
- - Fountains For Ponds & Lakes
- - Grease Trap Enzymes
- - Mosquito Control in Ponds
- - Pond Aeration Systems
- - Pond Algaecides & Natural Bacteria
- - Pond Dyes: Aesthetics & Growth Control
- - Pond Liners
- - Pond Muck Removal
- - Pond Pumps: Submersible & External
- - Rotary Vane Pumps & Air Compressors
- - Septic Bacteria Treatments
- - Solar Aeration Information
- - Weeds & Nuisance Aquatic Plants in Ponds
- - Windmill Aeration & Windmill Pumping
- - Winterization of Ponds
- - Algae: Basics of Pond Algae
- - SOTR, Oxygen Transfer Rates & Pumping Rates
- - Pond Algae
- - Questions & Answers
- - Waterfalls: Building a Waterfall
- - Weighted Airhose, Airline & Tubing for Ponds
- - Links to Suppliers & References
- Consultations
- Books & Guides
- Links & Resources
Dock Bubbler Packages


Categories:
Dock Bubblers & Deicers -
Dock Bubblers & Deicers -
Product Code: PR-DOCKBUBBLERPK
Availability: In Stock
Free shipping in the USA.
Product Code: PR-DOCKBUBBLERPK
Availability: In Stock
Free shipping in the USA.
Price: $3,525.00

Free Shipping in the USA
Pond bubbler deicer packages suitable for protecting docks, boathouses, seawalls, boat lifts and houseboats.
Dock Bubblers use a weighted bubbler hose or de-icer diffuser tubing to create surface agitation and keep structures from being locked in the ice. A dock bubbler typically keeps a smaller area open in the ice than a submersible motorized propeller type of deicer and this is attractive to dock owners living on shared bodies of water when neighbours might not want thin ice near their property. In most situation the weighted bubbler hose is placed at the far end of the structure you are trying to protect, ie: the deepest part. Bubblers will work in todal waters as well or in lakes that lower the water levels during winter.
For help with customizing a system please email us with details, if you can include drawngs or photos of the structure needing protection or application including depth locaion etc, it will help us design an offer suggestions for a dock bubbler system.
Available in Three Sizes
|
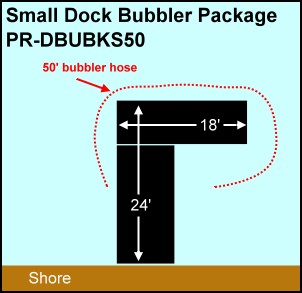
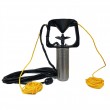
Small Dock Bubbler Package
|
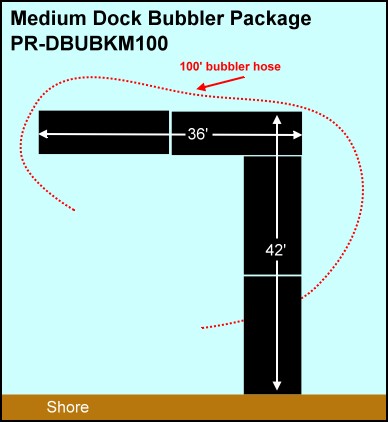
Medium Dock Bubbler Package PR-DBUBKM
|
|
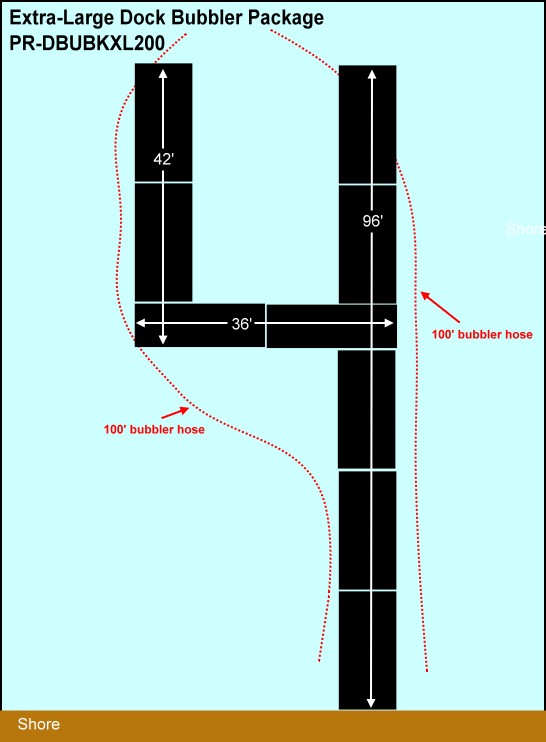
Large Dock Bubbler Package PR-DBUBKL
|
|
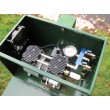
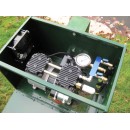
Step 1 : Install the ventilated compressor cabinet in your boathouse or shed. Build a simple wooden box if you don't have a nearby shelter handy.
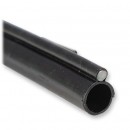
Step 2 : Connect the weighted airline to the valve outlet that is supplied with the compressor. Tighten clamps firmly but do not overtighten.
Step 3 : Connect the weighted self-sinking airline to the bubbler tubing. Do not bend the bubbler hose sharply as it can kink; instead of trying to make a 90 degree bend around a certain piling or footing use gentle angles with the tubing so the airline doesn't kink or split. The lead keel of the bubbler tube can be cut with metal shears. Make sure the end of the bubbler tubing has the plug inserted in the end! If you do want to make your bubbler wrap tightly around corners cut the tubing and use a 90 degree 1/2" barbed plastic insert to connect two pieces at the corner.
Step 4 : Once you have positioned your tubing start the compressor and do a visual check to ensure there are no areas where you see huge bubbles. Having airflow running through the
line during submersion helps ensure your placement is correct as you can follow the bubbles at the surface and ensure the water movement is uniform. You want to see bubbles all along the entire length of the bubbler hose, if there is an issue with the installation you will quickly see the evidence: kinks in the bubbler hose will cause the airflow to stop before it reaches the end of the bubbler hose.
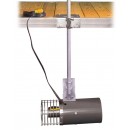
Step 5 : Install the diffuser bubbler dock de-icer tubing in a line around the area you want to keep free from ice. Usually the tubing, which is weighted, is placed on the outside edge of the structure you are trying to protect. If it is possible the tubing should be kept on a fairly consistant depth or you will lose bubbles in deeper zones. The tubing can also be attached to the pilings of the dock or fixed to suspended stakes which are attached to the dock to ensure the tubing is at a fairly consistant depth. To compensate for differences in depth you can also connect your air feeder line to the bubbler hose at the deepest part and have the plugged end of the bubble tubing in the shallowest area; this often requires more feeder line if your compressor is located on shore but it can help. When in doubt, remember it is better to install your bubbler in July and not October...even with waders on you won't find many volunteers to install your dock bubbler in November!
A depth difference of a few feet won't matter but avoid putting one end of your dock bubbler hose in very shallow water and the other end in very deep water. A small depth differential won't matter too much but keep it in mind when sizing out your system. It sometimes can be better, especially if you have deeper waters, to use shorter lengths of bubbler tube. Strapping the tubing to your pilings or footings is an easy way to make sure the depth is relatively constant.
Notes
The weighted bubbler hose can also be attached to support poles or a constructed grid which is then suspended from chains or ropes.This would allow the bubbler hose to be owered to a consistant and equal depth.
Keeping the bubbler hose at 5 feet depth or deeper will create larger areas of open water.
Using bubbler hose in shallow waters less than 2 or 3 feet can be less effective. In shallow waters or tidal waters a dock bubbler like this should be seen as a mitigation strategy against ice damge and is not system that offers a guarantee of success.
Below are some conceptual images showing different dock structures and a basic idea of how the weighted bubbler ice-melt tubing is placed. Keep corners and tubing bends to a minimum as the poly pipe can kink if it is bent too sharply. Use standard poly fittings if you need to do corners or angled direction changes, keeping in mind that every fitting wil cause a slight back-pressure and the airflow will be restricted slightly at each fitting which can cause a restriction in airflow past the fitting..
If running ong lengths of bubbler hose try and keep the depth uniform to ensure the airflow can fill the entire length of the hose, if one section is in deeper waters the hydrostatic pressure can cause the airflow to be reduced and the bubbles will emit only from the shallower section. Strapping the bubbler hose to footing or pilings or building a grid or guide can mitigate this issue.
 Small Package Includes: Small Package Includes:
|
 Medium Package Includes Medium Package Includes
|
|
|
For customizeable dock bubbler systems with cabinets click here
Need an Air Compressor?
Stratus Piston Air Pump
Write a review
Your Name:Your Review: Note: HTML is not translated!
Rating: Bad Good
Enter the code in the box below:


The Pond Report - Acadian Aquatic Systems
Pond Supplies for private pond owners and commercial pond managers.
Pond and lake products and treatments for natural pond care and aquatic management
Fast and free shipping from our Florida, , Michigan, California and Arizona Distribution Centers.
ThePondReport.com is a participant in the Amazon Services LLC Associates Program, an affiliate advertising program designed to provide a means for sites to earn advertising fees by advertising and linking to Amazon.com. Read our disclosure policy regarding the affiliations and commercial incentivizations of The Pond Report web site.
Copyright 2006 - 2026