Pond Pumps & Building a Waterfall
Your
pond pump is one of the most important aspects of your pond
One
of the highlights of a pond or backyard watergarden can be the waterfall.
A waterfall is something that when we experience one in a natural
setting always fills us with awe.
I have been camping as a child and some of the most vivid memories
are of seeing a cascading chute of raw river water tumbling over a
natural granite formation!
We Found
it On Amazon
As an
Amazon affiliate we may recieve payment for purchases made through
Amazon.
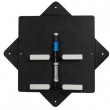
WaterFall Diffuser
A fast and easy way to create professional looking waterfalls
Ideal for use at beginning of streams and in block walls, pools
and formal fountains
Super strong vertical rib design creates a nearly indestructible
waterfall diffuser spillway.
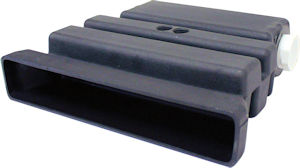
Price and more info on Amazon
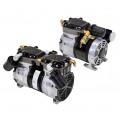
Submersible
Pump
Asynchronous pumps combine the efficiency of magnetic induction
with the power of direct drive geometry, keeping operating and
ownership costs to a minimum.
Atlantic's TT-series pump more water for less watts, making
them the ideal choice for water gardens and continuously Operated
water features.
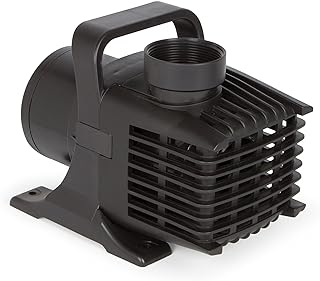
Price and more info on Amazon
As an Amazon affiliate we may recieve payment for purchases
made through Amazon. |
As I grew older,
and perhaps a bit colder, I never ceased to be awed and amazed by
a waterfall...it is perhaps one reason that so many of our clients
are looking for free waterfall plans or instructions for building
a cheap waterfall.
The thing is, I always tell my clients that there is no such thing
as a really well built cascading waterfall that is cheap.
I have seen some of my clients refuse to believe that they needed
a 45 mil EPDM membrane to line their rocky cascade and instead they
went and bought a cheap pond liner that was nothing more than a geotextile
that they used to line their waterfall.
The result?
Well you can imagine that the waterfall leaked and the liner disintegrated
within a year and the pump clogged and well....you get the picture...if
you are looking for the best way to build a waterfall you should always
try and build it right...you can build a cheap waterfall but it often
won't be right.
Having
a leaking waterfall or a waterfall pump that doesn't have the right
flow for the head or width of the waterfall can make it look like
a leaking swamp!
Building a waterfall, doesn't really require an expert as much as
it requires expert advice. The thing to do when you are building a
waterfall is to make sure the pumps and liners and rock structure
and waterfall lighting is actually appropriate for the height of the
rock pile and width of the water cascade you are envisioning.
Your
Pump Is The Heart of Your Pond and Waterfall
Your pond is alive with fish and pants and algae and
insects and all of them are trying to find a balance.
Think of your pond as a human body with blood and bones and skin
and hair and you see how we can draw parallels between a pond and
a living person.
What is the one thing that every one of us needs to keep healthy
in order to guarantee our survival? The Heart!
Yes the heart pumps our oxygenated blood through our veins and into
our brains and lungs and keeps our vital organs strong and alive...it
is much the same for a pond and the pump is like our heart; you
need a reliable pond pump to ensure that everything is moving and
the nutrients, lungs and organics in your pond are all well kept!
Just like our
own nutrition is important so is the nutrition of a pond and again,
the pump plays a primary role in ensuring that the water doesn't
stagnate and keeps moving through the thermocline and into the upper
levels of the pond and to the surface where the oxygen transfer
can occur.
Yes...the pond pump is one of the pieces of the puzzle that should
be researched before buying. Check the favorable reviews for your
pump before you buy it...there are many variations available from
amazon.com and ebay.com but not all motors are created equal.
Many of
my clients ask me how to build a pond pump or how to build a pond
aerator and the answer is always pretty much the same: you can't
really!
Well of course if you are like the Professor from Gilligan's Island
you might be able to build a pond aerator system out of palm tree
leaves and coconut husks wrapped around old stainless steel dishwasher
muffler parts but not everyone has been to NASA science school...some
of us...myself included couldn't build a homemade windmill aerator
if my life depended on it!
You may have electricity near the pond are considering a 110 volt
or 120 volt submersible or shore mounted linear pump. These work
very well even for driving a waterfall. Some of my clients consider
solar pumps, solar aerators or solar powered lawn mowers! OK...I
may be exaggerating with the solar powered lawn tractor as usually
it is too expensive to make a fountain or pump work with cheap do
it yourself solar power systems.
"Listen up"
my wife said! Instead of trying to build a cheap aerator or fashion
a homemade pump system from the old tennis rackets and fireplace bellows
you have in the garage just make the leap and buy a good quality pump
for a few hundred dollars.
I know it isn't in some of your genetic code to spend more that $19.99
on a pump but if you value the investment you have put into building
a pond and stocking it with fish then you should perhaps use professional
equipment to aerate and make your waterfall instead of trying the
DIY route!
I'm not against trying to whittle a beer-opener out of a tree branch,
heck, I've done that many a time but when it comes to my pond I want
to just buy a cheap pump that lasts for years and has good reviews
and then I'm all set!
My time is becoming more valuable as I get older and I don't want
to spend 12 hours in the garage building my own aeration pump if I
can order one for a few hundred bucks!
The Pump
Looking
for a small pond pump? See Our Choices For Pumps on Amazon
As an Amazon affiliate we may
recieve payment for purchases made through Amazon. |
|
|
|
|
|
|
|
|
Stage 1 - Placement
of pump Secure flexible tubing to the outlet of pump using a stainless
steel hose clamp. Submerse at the furthest point from the waterfall.
Route the tubing over side of pond (can be hidden under perimeter
stones). Make sure the stone does not pinch the tubing, and avoid
sharp bends in the tubing so it does not kink and reduce flow.
Stage 2 - Tubing
Route the tubing to the waterfall. Bury under soil.
Stage 3 - Building waterfall pond Use
displaced soil from pond to build an elevated area for waterfall.
Consider making a small auxiliary pond in this mound. Position the
spillway to flow into main pond. Build the small pond using the same
techniques and liner as the main pond. Two layers of liner are recommended
for this pond. The first one contains the water. The second liner
channels the water towards the fall. Important! Be sure the liner
drapes underneath the waterfall spillway stones - otherwise you will
experience water loss when the waterfall is in operation. You may
need to use liner seam tape in this stage.
Stage 4 - Building spillway Once the
spillway liner is in place - you will want to pump water up to the
auxiliary pond and watch it flow down the liner spillway. (At this
stage - your pond should be full of water). Carefully select stones
and position them - while the water is flowing over them. With the
water flowing over the rock, you may replace, shift and add stones
so you achieve the desired water spills you desire. Place plant moss
and small plants between the stones around the waterfall to achieve
a natural look.
Waterfall
& Pond Books & Guides
Our
Favorite Selections From Amazon

As
an Amazon affiliate we may recieve payment for purchases made
through Amazon.
|
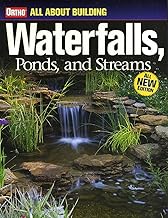 All
About Building Waterfalls, Ponds, and Streams All
About Building Waterfalls, Ponds, and Streams
A practical, easy-to-understand guide to adding both still (ponds)
and moving (waterfalls and streams) water features to any garden.
Includes complete, easy-to-follow instructions on designing,
establishing, and caring for a variety of eye-pleasing water
projects.
More than 220 vivid photographs and illustrations, plus detailed
instructions, make this guide a must-have for garden enthusiasts
looking to plan and build a water feature.
Expert advice on selecting the right fish and plants for embellishing
any backyard aquatic paradise.
Solution-based format will inspire you to confidently create
water havens in your own yard.
|
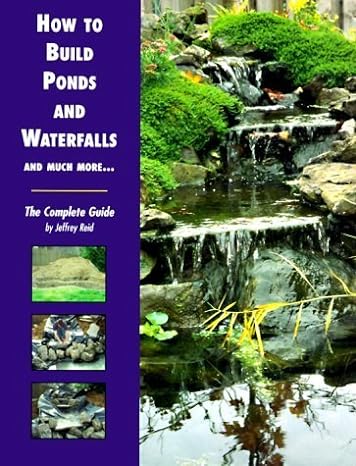 How
to Build Ponds and Waterfalls and Much More... How
to Build Ponds and Waterfalls and Much More...
This incredible book was written with the consumer in it's a
show and tell presentation of everything needed to build spectacular
water gardens.
Jeffrey Reid proves that knowing the correct steps and using
the right product for the job practically guarantees success.
The methods shown in these chapters are proven, and have been
taught to thousands of do-it-yourselfers.
In an easy-to-read and easy-to-understand format, this book
shows readers how to build ponds and waterfalls, as well as
providing information about Koi fish, submersible pumps, water
lilies, water features, water garden designs, UV lights, rock
placement, filter systems, pond fish, marginal plants, preformed
ponds, excavating, pond liners, plumbing, and landscaping.
Adding a pond or waterfall to your landscape can be very rewarding.
|
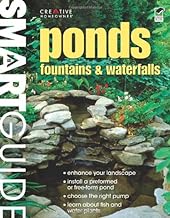 Smart
Guide: Ponds, Fountains & Waterfalls (Landscaping) Smart
Guide: Ponds, Fountains & Waterfalls (Landscaping)
Whether readers are deciding on the type of pond that best suits
their wants and needs or trying to decide whether a stream or
a waterfall fits better into their landscape, Smart Guide: Ponds,
Waterfalls & Fountains has it all.
Chapters cover everything from plant and fish selection to tips
on choosing a spray or statuary fountain, how to install pond
shells, digging out a watercourse and waterfall, and even adding
accents such as bridges and steppingstones to the backyard.
For homeowners who can't wait to get started in the spring and
want to show off their creativity, Smart Guide: Ponds, Waterfalls
& Fountains will not only help their project take off; it
will instill the confidence to finish. |
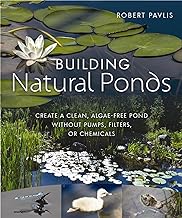 Building
Natural Ponds: Create a Clean, Algae-free Pond without Pumps,
Filters, or Chemicals Building
Natural Ponds: Create a Clean, Algae-free Pond without Pumps,
Filters, or Chemicals
Typical backyard ponds are a complicated mess
of pipes, pumps, filters, and nasty chemicals designed to adjust
pH and keep algae at bay. Hardly the bucolic, natural ecosystem
beloved by dragonflies, frogs, and songbirds.
The antidote is a natural pond, free of hassle, cost, and complexity
and designed as a fully functional ecosystem, ideal for biodiversity,
swimming, irrigation, and quiet contemplation.
Building Natural Ponds is the first step-by-step guide to designing
and building natural ponds that use no pumps, filters, chemicals,
or electricity and mimic native ponds in both aesthetics and
functionality. Highly illustrated with how-to drawings and photographs.
|
Back
To Your Waterfall
Let's look at my last simple, cheap waterfall in a small pond I
built with my brother-in-law. I'll tell you first off I'll think-twice
next time I say "Yes" to building a pond for a friend
or relative without setting some clear contractual rules of engagement.
Shaking Jimmy's hand after a few cold beers at last month's Family
Reunion the pig-roast might not have been the best idea! But hey...any
time you can built a unique and original cascade for a pond it is
worth it in the end! So Jimmy, I salute you in the end! It looks
fine!
We used a molded
pond often called a "molded" pond by perfectionists and
folks from Canada so we had to excavate the hole in the backyard
to place the pre-formed pond.
While I prefer to work with a 45mil EPDM liner in most ponds, in
this case we had found a cheap prefab pond and it looked good.
So we got our shovels out and spent the day digging around the tree
roots and gopher holes and finally had a three foot deep hole with
the approximate shape of the pond which was only a 400 Gallon pond
shaped like a pork chop. We had a pile of soil beside the pond hole
and this is what we we planned to use for the waterfall structure.
Most of the time I like to build a small catchment basin or a smaller
retention pond above the main pond so the waterfall has a high point
to allow water to gather and then spill over the rock waterfall
structure that I have built.When I decide on what sort of waterfall
pump I will be using for the homemade waterfall I start with a very
simple calculation to ensure that the flow of water down the width
of the waterfall will appear natural.
It is important to understand the volume of your pond system (including
the total volume any streams and waterway diversions you create)
in order to choose the best submersible pump for the job.
If you use a pump that pumps 1600 Gallons Per Minute but your waterfall
requires a pump that delivers at least 2200 Gallons Per Minute that
your cascade will look like a drought has struck your pond!
Looking
for a small pond pump? See Our Choices For Pumps on Amazon
As an Amazon affiliate we may
recieve payment for purchases made through Amazon. |
|
|
|
|
|
|
|
|
For
waterfalls it is recommended to have between 50 Gallons per Hour
and 150 Gallons Per Hour for every inch of width of your waterfall.
I.e.: If you want an 18" wide waterfall you should have a pump
giving between 900 and 2700 Gallons per Hour.
To determine the size pump you need for your pond, take the total
volume of water of your pond (in gallons) and select a submersible
pump that will pump at least that much water per hour. So, if you
have a 1000 gallon pond, you will need a pump with a flow rate of
at least 1000 gallons per hour. It is better to use a larger pump
that required and add a flow restrictor valve, this allows you to
adjust the flow as required.
Why should
I have a pump?
You do not absolutely have to have a pump for a pond you may want
it to look "natural" without any ripples or movement but
sometimes stagnant or still waters can be breeding grounds for mosquitoes
and algae and green water can become a problem...not all the time
but often a pond without a good circulation/aeration system will
develop problems so if you do want a pump there are many benefits
as we've discussed in our aeration pages.
As we've said the
pump is the "heart" of any pond and is good at supplying
a small fountain, a waterfall or even pumping through your skimmer
and biological filter.
The size of
the pump you choose depends on what you want it to do. If it is
just for a fountain then most pumps come with suitable attachments.
If it is to run a filter and fountain then it needs to be slightly
bigger.
There are multipurpose systems that have multiple outlets that allow
tubing to run to your spitter or waterfall as well as add-on fountain
nozzles that can be changed to create cheap fountains anywhere from
12 inches to 6 feet of spray above the pond!
The Pond Report Online Store
|
The quantity
of water in the pond dictates this. If you have a "average
pond" then the water should be turned over every 3-4 hours,
but it should be every 1-2 hours for a koi pond. Your choice of
pump should be one that is big enough to turn the water over often
enough and run a fountain (if required) It is better to have a bigger
than required pump as you can reduce the flow easier than trying
to increase the flow of an undersized pump!
Now...choose
the best pump for your surroundings
There are two types of waterfall pumps we use. The External Pump
and the Submersible Pump. The external pump sits outside of the
pond much like a swimming pool pump would. It has an intake hose
in the pond, preferably at the deepest point of the main pond and
far from the waterfall to provide the best circulation efficiency
for the system. The Submersible pump is actually in the water and
sucks water directly through the pump into the outlet hose to the
waterfall or retention basin. Both work, but all pumps are not equal.
So what is the
best pump available? The choice of pump is up to you, but you should
take a few things into consideration once you have made up your mind
on using a submersible sump pump type of pond pump or fountain pump
or the ground mounted external system.
If you
want a fountain and filter will the pump be strong enough to run both?
I often suggest that you have two separate pumps but the 110V submersible
pumps are often the best choice for the average small pond or water
garden.
Do not forget at night the general ambient noise level is quieter
than during the day so what may be a pleasant "lapping"
or "tinkling" sound when the fountain is splashing during
the day can become an extreme "crashing" or "gushing"
noise at night which may upset you and your your neighbors more than
the teenager with the new car down the street with his new sound system
in his totally tuned Honda! If you have two pumps you can turn the
fountain pump off when it gets late, or better still fit a timer on
to your pond system and have the noisy pond bits running only when
it is appropriate!.
Another
thing to be considered is how much will it cost to run? The cheap
pump from the hardware store or the one you bought on Ebay may be
cheaper to purchase but what about its running costs and the warranty?
A "sump" pump is fine and you can buy one from the local
hardware store for less than $100 but those sorts of pumps are mainly
for sucking the flood waters from your basement and not designed for
continuous duty in a pond!
A system that must run 7 days a week and 24 hours per day must be
reliable and when it is running most of the summer, with the cost
of electricity, you need to avoid the cheap "power hungry"
models and get something that is efficient...the initial cost may
be high but just because you get a deal from Jimmy in South Dakota
selling his aquarium filtering pump on Ebay doesn't mean it's the
right thing to do!
How to calculate the right size waterfall pump:
First you should look at the width of your waterfall. When
you measure the width you are looking at the width of the top of the
waterfall, starting from where the water flows out of the catchment
pond if you have built one. Of course, you can always setup a system
of a single tube from a pump or multiple outlet pipes from one or
more small pumps in the pond at the far end, typically the deep end
of the pond, that simply cascade over rocks.
If you are not using a catchment basin and are only having hoses hidden
under stones or rocks to create the waterfall then you have to make
sure the pump and tubing is correctly sized or you may have a waterfall
that sprays out like my my Gramma used to say looked like "Pee
out of a Tomcat!". A waterfall, when it is natural, flows, drips,
dribbles and splashes...it definitely does not spray out like a spitter
or a fountain. This is why having a small elevated pond or retention
basin to be the start of the falls is often preferable.
For every inch of width of the lip of your waterfall you need to have
on average of 100 Gallons Per Hour or 1.6 Gallons Per Minute. For
every 10 feet of tubing between the pump and the output end of the
pipe you should calculate a loss of about 1 foot of head. Plus the
final height between the pump in the pond and the top of the output
pipe must be counted. It's a simple calculation really.
|
Natural
Pond Bacteria
 This
product has been dis-continued. Instead you can use the All
Season Pond Bacteria This
product has been dis-continued. Instead you can use the All
Season Pond Bacteria
The
product contains several strains of naturally occurring beneficial
bacteria ideal for breaking down and digesting waste commonly
found in pond environments to naturally keep ponds clean,
clear and healthy all year long.
Application Rates:
Normal Ponds: Initial Application 1 gallon per surface acre
Maintenance ½ gallon per month
Slightly Troubled Ponds: Initial Application 1 gallon per
surface acre Follow Up ½ gallon per week for 4 weeks Maintenance
½ gallon per month
Troubled Ponds: Initial Application 1 gallon per surface
acre Follow Up 1 gallon per week for 4 weeks Maintenance
1 gallon per month
All
Season Pond Bacteria
| Premium
Pond-Vive Bacteria For Ponds and Lakes
Breaks down organic sludge like leaves, dead plants, fish
droppings, fish food, fertilizer and dead algae. Reduces odors.
Harmless to fish, animals and turf plants.
This fast-acting product contains several strains of totally-naturally
occurring beneficial bacteria which begin instantly breaking
down and digesting waste commonly found in pond environments
to naturally keep ponds clean, clear and healthy all year
long, while utilizing pulverized barley straw to eliminate
the need for bulky barley bales, while still providing the
water clarifier benefits of barley straw.
|
EXAMPLE:
The waterfall is 36" wide (width at the top, this is how
wide you want the water stream over the waterfall lip to be)
The total "head", the height between the bottom intake of
the submersible pump to the highest point of the tubing, is 4 feet.
There is a 50 foot length of tubing running from the pump on the main
pond to where it enters the retention pond or the top of the waterfall.
The 36 inch wide waterfall requires 3600 Gallons Per Hour (100 Gallons
Per Inch)
There is a 4 foot head (Height difference from pump to top of tubing)
50 feet of tubing is equal to an additional 5 feet of head. (Every
10 feet of tubing equals 1 foot of head)
You need a pump that can pump 3600 Gallons Per Hour at a 9 foot head,
or lift as it is sometimes called. Make sure your pump can deliver
the correct flow at the correct head!
Now...choose the best pump for your surroundings
There are two types of waterfall pumps we use. The External Pump and
the Submersible Pump. The external pump sits outside of the pond much
like a swimming pool pump would. It has an intake hose in the pond,
preferably at the deepest point of the main pond and far from the
waterfall to provide the best circulation efficiency for the system.
The Submersible pump is actually in the water and sucks water directly
through the pump into the outlet hose to the waterfall or retention
basin. Both work, but all pumps are not equal.
Promotional Materials, read these and understand what the different
componants are that they use. Instead of a kit you can build your
own!
" Aquascape's Waterfall Kit comes complete with everything you
need to incorporate the sight and sound of cascading water into your
yard or landscape All necessary components are provided in a convenient,
all-in-one kit that takes the guesswork out of purchasing individual
components The innovative AquaSurgePRO 2000-4000 allows you to adjust
the flow of the pump wirelessly Includes Waterfall Vault makes accessing
your pump and checking water levels quick and easy and Complete LED
Lighting Package for night-time enjoyment Aquascape is passionate
about the products we produce, providing unique products, designs,
and features that stand above the competition.
The Aquascape Medium Waterfall and Stream Kit comes complete with
everything you need to incorporate the sight and sound of cascading
water your yard or landscape, providing up to a 16-foot Waterfall
and Stream. All necessary components are provided in a convenient,
all-in-one kit that takes the guesswork out of purchasing individual
components. The innovative AquaSurgePRO 2000-4000 allows you to adjust
the flow of the pump wirelessly.
The included Pondless Waterfall Vault makes accessing your pump and
checking water levels quick and easy and the included AquaBlox eliminate
the need to fill your basin with large quantities of gravel and stone.
Aquascape is passionate about the products we produce, providing unique
products, designs, and features that stand above the competition.
"
That sounds all good but in the end are we buying the sizzle or the
steak?
External
Pond Pumps
Looking
for a small pond pump? See Our Choices For Pumps on Amazon
As an Amazon affiliate we may
recieve payment for purchases made through Amazon. |
|
|
|
|
|
|
|
|
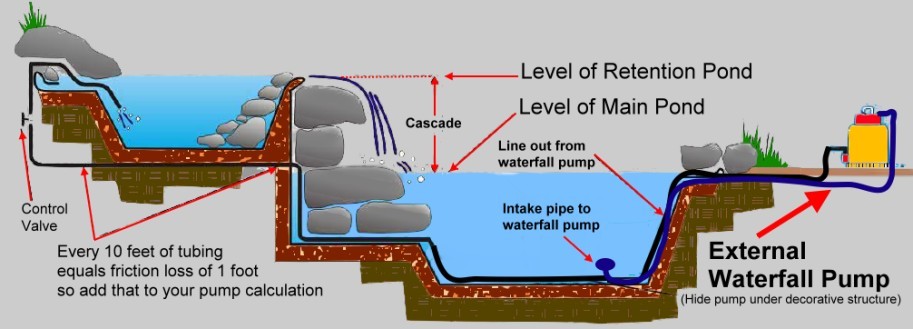
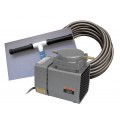
External pond pumps are usually mounted on the shore
and are great because they are easier to service because you don't
need to go up to your elbows in stinky, smelly pond water to retrieve
them!
Place the pump in some sort of insulated cabinet, shed or pool house
to make sure the system is not exposed to rain, snow or other such
hazards like the gnashing teeth of muskrats, beavers and squirrels!
The diagram below shows one popular way how to install your pond
pump. The units we use are all 220V so if you only have 110/115V
then check out the pumps with fountain heads included below this
section.
The Pond
Report has tested dozens of external pond pumps including the Dynamo
Pumps, WunderFlo Pumps, Aqua Flow, Artesian Pumps, Cascade Pumps,
Swing Check Valve Sequence Pumps, Little Giant etc. etc until we
were sick of trying every little cheap pump that said "Made
in China" on the sticker!!. Of course we all prefer something
that is "Made in USA" or we have found Japan, Taiwan,
and Germany also make very good aquatic systems!
Our overall best-performing winner of all reviews of external pond
pumps is the SF-SeaFlo series of pumps. They are a high performance
pump that require a 208/230V electrical service. Designed for larger
ponds and systems that require an extra and powerful flow these
are self-priming with a high efficiency impeller and life extending
diffuser wear ring. They all have a fiberglass reinforced. 2 suction
and discharge ports. Single piece corrosion resistant over sized
strainer pot and volute.
Unique diffuser
and impeller provide excellent pressure performance across wide
range of desired gallon per minute flow rates. User friendly drain
plugs. All stainless steel hardware. These pumps are our favorites
as they offer an unprecedented 3 year limited warranty.
The Pond Report has given Pentair Sea Flow High Performance Self-Priming
Pumps feature sophisticated design translated into unprecedented
power that offers the ultimate in efficiency our highest PK 7 rating
as they are simply the best pumps money can buy. . These unique
external pond pumps are designed to handle the larger capacity jobs
of ponds or larger aquariums to deliver excellent flow with less
friction and less noise while using smaller horse power motors.
For best pump performance, install this pump out
of direct sunlight within 3' of the water surface level.
Perfect for use in pool, water garden, and koi pond applications,
these aboveground pumps keep maintenance convenient. The large strainer
basket and see-through lid permits fewer services and easy inspection.
Their unique diffuser and impeller provide excellent pressure performance
at a wide range of gallon-per-hour flow rates. Easy to remove drain
plugs on the strainer basket and pump chamber make end of season
maintenance a breeze.
Well the truth is that it works much like a regular pond. A hole,
deeper than a normal pond, is dug, then lined with rock and gravel,
and filled with water. The water is then circulated from beneath
the rocks and gravel by a pump that sits on the bottom. A pipe runs
from there up to a BIOFALLS filter and into an overflowing waterfall,
where it falls back to the reservoir. Since the water level never
pools above the level of the rock and gravelfill, it gives the appearance
of a pondless waterfall. But the greatest part of it all is that
all the anxieties you have about ponds goes right out the window
the minute the waterfall is turned on! NurseryPro MicroPondless
4' Waterfall Kit includes: MicroCentipede Module, MicroSnorkel Vault,
MicroFalls Filter Vault (no filter media is included. The aggregate
in the basin provides a much larger surface area for bacteria to
grow than the filter media do), AquaSurge 2500 GPH Pump, 1.5' x
25' Kink Free Pipe, Plumbing Assembly, 10 foot x 12 foot 45 mil
EPDM Liner, 10 foot x 10 foot Underlayment, & Installation Instructions.
Browse through our TJB-INC Amazon Store for more Aquascape items.
Waterfall
Websites
Here are some websites we recommend if you are looking for simple
instructions for free on do it yourself waterfalls. You might find
some helpful information.
Waterfall
Design Examples, Parameters & Techniques:
https://www.rockwoodforest.com/aquatics_and_ponds.htm
As the test water is being added to the pond, the waterfall/stream
liner can be installed. You will need the waterfall/stream liner
and the two-sided pond tape. Clean the surfaces to be joined thoroughly.
Use a bit of rubbing alcohol and a lint-free cloth to get a particle-free
clean surface. Scuff the newly cleaned surface with a clean scuffer
(something that is gently abrasive), then wipe again. The installation
of the waterfall liner will be easier with a flatsurface to work
on so the patio slabs should do the trick. Begin to apply the two-sided
tape to the cleaned and flattened pond liner by exposing one side
of the tape to the liner but by leaving the waxed paper backing
on the tape. Do NOT take the waxed paper backing off of the tape
and then try to apply the tape. You will need the backing to flatten,
smooth, and de-bubble the tape for a good seal. This process will
work better on a liner that is warm. Sunny, hot days are perfect;
however a hair dryer on a cool day will do the trick. When you are
confident that you have a good seal, remove the waxed backing by
peeling up a corner and pulling it back slowly and low at a 45oangle.
If all goes well, then you are ready to install the waterfall liner.
Place the edge of the waterfall liner over-top of the seam tape
leaving about a ¼ of the tape exposed. (see drawing) Smooth the
liner and apply pressure to get a good seal. Rub in multiple directions
to be sure the seal is tight. Leaving the ¼ exposed allows you
to make sure the leading edge of the waterfall liner is sealed to
the tape. This procedure is recommended and taught by Firestone,
so if done correctly, it should work 100% of the time. Two sided-tape
is used so that a smaller waterfall line can be attached to a largerpond
liner for less waste. It also prevents wicking and water loss between
the lines via capillary action.
Building a Garden Pond https://www.gardenandhearth.com
"Using a Weir The easiest way to build a waterfall
is to use a weir. A pond weir is a plastic box. It collects water
that the pump has pumped into it. One side of the box is lower than
the rest and has a lip on it so water will go over it and back into
the pond. These can be effective when building a waterfall. Simply
elevate them above your pond, usually positioning them level in
the dirt you have dug out to make your pond, put tubing from your
pump into the weir. When the weir fills up, a sheet of water will
fall over the weir and into your pond. You can hide the weir with
rocks so no one can see the plastic box. Also, if you have a biofilter,
you can put it in the weir. As an aside, if you do have a biofilter
and use lava rocks in it, put them in several mesh bags, not just
one. It takes several strong men to lift just one bag out, so use
at least three. I usually float some hyacinths or other floating
plants in the weir to further camouflage the plastic box."
Pond Waterfall Design https://www.californiawaterscapes.com/Waterfall-build.htm
"Pond Waterfall Design There are several types of sounds created
by what the water is falling onto. The most pronounced is water
falling directly into a pool of water. Next is a shallow pool, followed
by water falling onto a rock or boulder and then water sliding over
rocks or boulders. The distance the water falls is a very key factor.
A 3 inch to a 4 inch drop can be quite subtle, but as its increased
to 18 to 20 inches, the sound increases significantly. Of all the
factors when building a waterfall, this is the most distinct. You
can experiment with a garden hose running into a bucket or a pool
and note the difference."
Certified AquaScape Contractors
https://www.certifiedaquascapecontractor.com/pond-construction.php
Excellant resource that includes their 18 Steps of Pond Construction
from Start to Finish: 1. Mark Pond Area 2. Place Skimmer and Waterfalls
3. Lay Plumbing 4. Hook up waterfalls 5.Excavate Pond 6. Install
Liner and Underlayment 7. Hook-up Skimmer 8. Rock in Pond 9.Position
Underwater Lights 10.Wash Stones 11.Fill Pond 12.Build Waterfall
and Stream 13.Bring in Top Soil 14.Build Retaining Wall 15.Tweak
Waterfall 16.Trim Liner 17.Mulch Berm 18.Clean Up . Of course they
may have forgot my favorite step which is 19 and 20 to have a beer
and watch my pond!!
Certified Aquascape Contractors (CAC's) are the most qualified and
informed installers in the pond construction industry. All CAC's
are required to attend continual training and education seminars
and maintain a proven record of outstanding work and dedicated customer
service and support.
Email us for information
or with your questions.
 Pond
Report Store Pond
Report Store
The
pond report also has information on:
Algaecides
& Bacteria | Deicers
& Bubblers | Weed
Removal | Liquid
Bacteria | Pond
Pumps & Fountains | Aeration
| Winter
Pond Care | Algae
Control | Pond
Liner | Muck Pellets |
Build
a Solar Aerator | Rotary
Vane Compressors | Floating
Fountains
| Building
a Pond | Linear
Air Compressors & Pumps | Weighted
Airline | Diffusers
& Airstones | Solar
Aeration Systems | DC
& Battery Operated Pumps | Windmill
Aeration | Dock
Bubbler Packages | Building
a Waterfall |
Dyes & Colorants | Consultations
| Questions &
Answers | Links
& Resources | Eurasian
Milfoil
| |
Mosquito Control | Pondkeeper
Treatments | Aeration
Systems | Septic
Bacteria | Grease
Trap Blocks | Dissolved
Oxygen Meters | SOTR
& Pumping Rates |
Portable
Generators |
Duckweed Control
|
Pond
Plans & Pond Building Books & Guides |
© 2007
- 2024 The Pond Report
about
us | privacy
policy | contact
us
|