Your shopping cart is empty!
Categories
- Soilfloc Pond Sealant
- Aeration Systems
- Air Pumps & Compressors
- Algae Control
- Algaecides & Herbicides
- Bacteria & Clarifiers
- DC Compressors & 12V Pumps
- Diffusers & Airstones
- Dock Bubblers & Deicers
- Dyes & Colorants
- Fountains
- Muck Removal
- Nozzles & Fountain Heads
- Pond Liner
- Pond Pumps
- Ponds & Lakes
- Treatments
- Tubing & Accessories
- Water Level Control & Gates
- Windmill Aeration
- Commercial & Industrial Supplies
- Solar Aeration
-
Information
- - Aeration
- - Air Pumps: Linear or Diaphragm
- - Airline & Tubing for Aeration Systems
- - Beneficial Bacteria
- - Build a Solar Aerator
- - Building A Dock Bubbler System
- - Building A Pond
- - Compost Aeration & Compost Tea
- - Diffusers: The Key To Efficient Aeration
- - Dissolved Oxygen Levels
- - Dock Bubblers & Deicers
- - Duckweed Control
- - Eurasian Milfoil
- - Fountains For Ponds & Lakes
- - Grease Trap Enzymes
- - Mosquito Control in Ponds
- - Pond Aeration Systems
- - Pond Algaecides & Natural Bacteria
- - Pond Dyes: Aesthetics & Growth Control
- - Pond Liners
- - Pond Muck Removal
- - Pond Pumps: Submersible & External
- - Rotary Vane Pumps & Air Compressors
- - Septic Bacteria Treatments
- - Solar Aeration Information
- - Weeds & Nuisance Aquatic Plants in Ponds
- - Windmill Aeration & Windmill Pumping
- - Winterization of Ponds
- - Algae: Basics of Pond Algae
- - SOTR, Oxygen Transfer Rates & Pumping Rates
- - Pond Algae
- - Questions & Answers
- - Waterfalls: Building a Waterfall
- - Weighted Airhose, Airline & Tubing for Ponds
- - Links to Suppliers & References
- Consultations
- Books & Guides
- Links & Resources
Dock Bubbler System - 1/2 HP with Bubbler Hose


Categories:
Dock Bubblers & Deicers -
Commercial & Industrial Supplies -
Air Pumps: Linear or Diaphragm -
Build Your Own Aeration System -
Product Code: Stratus™ Compressor Bubbler
Availability: In Stock
Free shipping in the USA.
Product Code: Stratus™ Compressor Bubbler
Availability: In Stock
Free shipping in the USA.
Price: $1,395.00

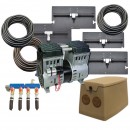
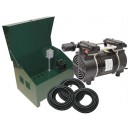
The heart of this bubbler system is the 1/2 HP rocking-piston air compressor. It comes with splitter valve-manifolds to allow up to 3 lengths of bubbler hose with a total length of up to 250 feet. There is an optional post-mount or wall-mount steel cabinet with a ventilation fan.
 Stratus™ line of rocking piston air compressors, each one designed specifically for the demanding job of 24 hour operation. They are ideal for pond aeration systems. The oil-less design safely aerates ponds with no electricity in the water. The shore mounted compressor sends air through tubing to a bottom mounted diffuser for a safe, effective way to aerate ponds.
1/2 HP Compressor System
- Inlet air filter, rubber foot pads and 6' power cord included
- Oil-less operation
- Lightweight die-cast aluminum components
- Hard coated cylinder for wear resistance
- Permanently lubricated bearings and easily replaceable piston seal
- Operate in up to 40' deep
- Rocking piston compressor with rebuildable piston cylinders.
- Optional: Powder coated green cabinet with 220 cfm circulating fan
- Optional Cabinet is lockable and can be mounted to a post or wall.
- 2 or 3 adjustable air control ball-valves
- Pressure relief valve & pressure gauge.
- 2-Year Limited Warranty.
Airflow at 10 PSI is approximately 4.8 CFM which can effectively provide air to up to 250 feet of Bubbler Hose for dock de-icing or bubblers.
The compressor system has two or three outlet manifolds to control airflow into 2 or 3 separate airlines.
With the two-way splitter you can purchase 125' or 250' of bubbler hose and cut the hose into two or three lengths of bubbler hose around the structure needing protection.
*Each run of bubbler hose should be kept to a maximum of 125'
Bubbler Hose
Weighted de-icer airhose/bubbler tube for deicing small and large areas. Weighted 1/2" I.D. tubing requires only 1 CFM per 100 feet (0.01 CFM per foot).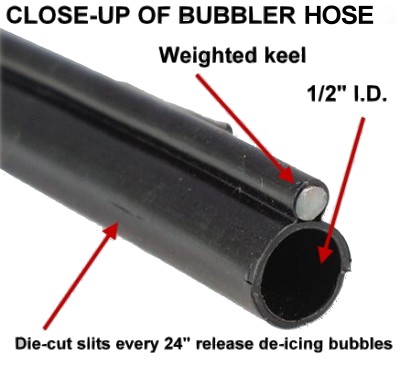
Single runs of up to 125' can be used with even bubble flow. Flexible tubing has a lead-wire encapsulated in poly to act as a weighted keel, keeping the deicer tubing firmly on the bottom.
You can purchase 125' or 250' of bubbler hose and choose either a two-outlet or three-outlet configuration and then cut the bubbler hose into multiple lengths.
With the two-outlet manifold you can run a maximum of 2 lengths of 125' or two smaller lengths of bubbler hose, for example two lengths of 75' or one run of 25' and one run of 100'. If choosing a three-way outlet manifold you could use 250' total of bubbler hose in three separate lengths of 83' or any configuration, for example two lengths of 75' and one run of 100'
Installing a Dock Bubbler
Step 1 : Install the compressor in your boathouse or shed. Build a simple wooden box if you don't have a nearby shelter handy. The compressor can be screwed to a piece of 3/4" plywood to hold it steady. Some folks put the compressor under a RubberMaid style of plastic container with some holes for ventilation. Just make sure the compressor is dry and out of snow and sleet and rain.
Step 2 : Connect the weighted airline to the valve outlet that is supplied with the compressor. Tighten clamps firmly but do not overtighten.
Step 3 : Connect the weighted self-sinking airline to the bubbler tubing. Do not bend the bubbler hose sharply as it can kink; instead of trying to make a 90 degree bend around a certain piling or footing use gentle angles with the tubing so the airline doesn't kink or split. The lead keel of the bubbler tube can be cut with metal shears. Make sure the end of the bubbler tubing has the plug inserted in the end! If you do want to make your bubbler wrap tightly around corners cut the tubing and use a 90 degree 1/2" barbed plastic insert to connect two pieces at the corner.
Step 4 : Once you have positioned your tubing start the compressor and do a visual check to ensure there are no areas where you see huge bubbles. Having airflow running through the
line during submersion helps ensure your placement is correct as you can follow the bubbles at the surface and ensure the water movement is uniform. You want to see bubbles all along the entire length of the bubbler hose, if there is an issue with the installation you will quickly see the evidence: kinks in the bubbler hose will cause the airflow to stop before it reaches the end of the bubbler hose.
Step 5 : Install the diffuser bubbler dock de-icer tubing in a line around the area you want to keep free from ice. Usually the tubing, which is weighted, is placed on the outside edge of the structure you are trying to protect. If it is possible the tubing should be kept on a fairly consistant depth or you will lose bubbles in deeper zones. The tubing can also be attached to the pilings of the dock or fixed to suspended stakes which are attached to the dock to ensure the tubing is at a fairly consistant depth. To compensate for differences in depth you can also connect your air feeder line to the bubbler hose at the deepest part and have the plugged end of the bubble tubing in the shallowest area; this often requires more feeder line if your compressor is located on shore but it can help. When in doubt, remember it is better to install your bubbler in July and not October...even with waders on you won't find many volunteers to install your dock bubbler in November!
A depth difference of a few feet won't matter but avoid putting one end of your dock bubbler hose in very shallow water and the other end in very deep water. A small depth differential won't matter too much but keep it in mind when sizing out your system. It sometimes can be better, especially if you have deeper waters, to use shorter lengths of bubbler tube. Strapping the tubing to your pilings or footings is an easy way to make sure the depth is relatively constant.
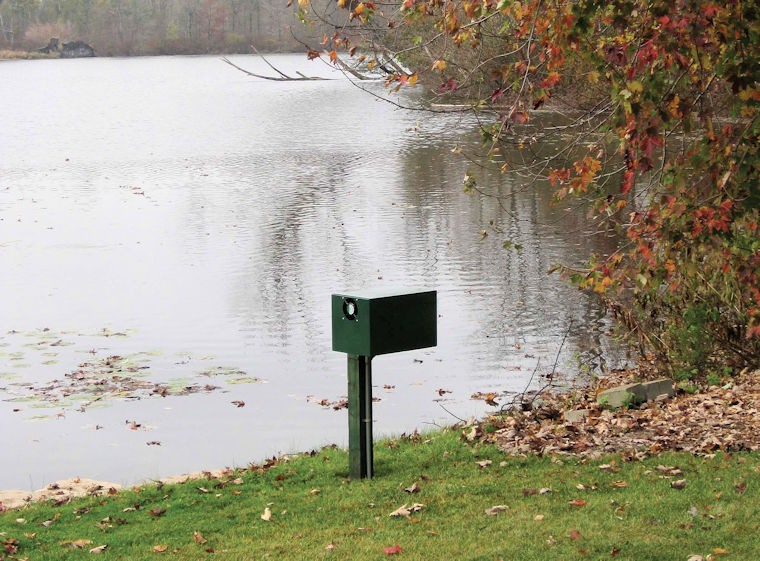
Optional Post Mount or Wall Mount Steel Cabinet With Fan
Size: 11 1/2″ W x 18″ L x 11 1/2″ H (POST NOT INCLUDED)
Includes 115V or 230V plug plug with GFI and Ventilation Fan. Lockable. Pressure guage, relief valve and two-way or three-way adjustable air manifolds included.
 Optional Weighted Airline
Weighted airline is available in 3/8" inner diameters. This tubing requires no weights. It is a heavy-duty, thick-walled PVC hose that is the industry standard for aeration and dock bubbler air supply.
Write a review
Your Name:Your Review: Note: HTML is not translated!
Rating: Bad Good
Enter the code in the box below:


Related
The Pond Report - Acadian Aquatic Systems
Pond Supplies for private pond owners and commercial pond managers.
Pond and lake products and treatments for natural pond care and aquatic management
Fast and free shipping from our Florida, , Michigan, California and Arizona Distribution Centers.
ThePondReport.com is a participant in the Amazon Services LLC Associates Program, an affiliate advertising program designed to provide a means for sites to earn advertising fees by advertising and linking to Amazon.com. Read our disclosure policy regarding the affiliations and commercial incentivizations of The Pond Report web site.
Copyright 2006 - 2026